Introduction
Valentine’s Day is the perfect time to express love and appreciation for the special people in your life, and what better way to do so than with a sweet homemade treat? Valentine Cake Pops are delicious and irresistibly adorable, making them a fantastic gift or dessert for your celebrations. These bite-sized delights are easy to make, fully customizable, and sure to bring a smile to anyone’s face.
Whether planning a romantic evening, a fun family activity, or a Valentine’s Day party, cake pops are a versatile option that can be personalized to fit any theme. From heart-shaped designs to colorful sprinkles and elegant finishes, there’s no limit to the creativity you can bring to these tasty treats.
In this post, we’ll guide you through everything you need to know to make your own Valentine’s cake pops, from the ingredients and tools to decoration ideas and expert tips. Let’s get started and create the perfect sweet treat for your loved ones this Valentine’s Day! ❤️
Table of Contents
Why Valentine Cake Pops Are the Perfect Sweet Treat
Valentine cake pops aren’t just a dessert—they’re a thoughtful way to show your love and creativity. Here’s why these sweet treats are the perfect choice for Valentine’s Day:
Great for Gifting
Valentine cake pops are the ultimate portable treat. Their compact size makes them easy to package individually in cellophane bags tied with ribbons or presented in decorative gift boxes. You can even personalize each cake pop with initials, heart shapes, or special messages, making them a unique and heartfelt gift for friends, family, or that special someone.

Customizable for Any Theme
One of the best things about cake pops is their versatility. Whether you want a romantic red-and-pink color scheme, glittering gold accents, or whimsical heart-shaped designs, the possibilities are endless. From candy melts in every color to sprinkles and edible glitter, you can tailor your cake pops to perfectly match your Valentine’s Day theme.
Kid-Friendly and Fun to Make
Making Valentine cake pops isn’t just about the result—it’s about the joy of creating them. This activity is perfect for families, especially if you have kids who love to help in the kitchen. From rolling the cake balls to decorating with sprinkles, everyone can get involved in the fun. It’s a hands-on, memorable way to celebrate Valentine’s Day together while whipping up something delicious.
Ingredients You’ll Need for Valentine Cake Pops
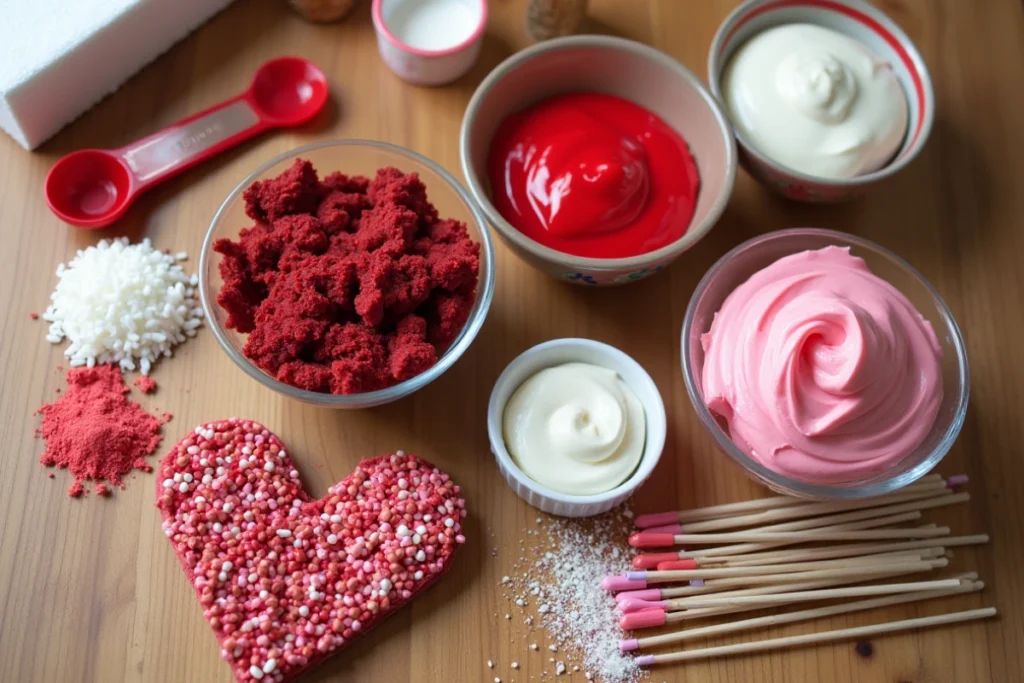
Before you start crafting your Valentine cake pops, make sure you have all the ingredients and tools ready. Here’s a detailed breakdown:
Ingredients
| Category | Options/Details |
| Cake Base | – Red Velvet Cake (vibrant and festive) – Chocolate Cake (rich and indulgent) – Vanilla Cake (simple and versatile) |
| Frosting | – Cream Cheese Frosting (pairs well with red velvet or chocolate) – Buttercream Frosting (a classic, versatile choice) – Ganache (for an indulgent twist) |
| Coatings & Decorations | – Candy Melts (red, pink, and white for a Valentine theme) – Sprinkles (heart-shaped, colorful, or metallic) – Edible Glitter (for a sparkling finish) – Food Coloring (to customize colors) |
Tools
| Tool | Use |
| Cake Pop Sticks | For holding the cake pops together and making them easy to eat. |
| Styrofoam Block | To hold the cake pops upright while the coating dries. |
| Mixing Bowl | To combine cake crumbs and frosting seamlessly. |
| Spoon or Scoop | For measuring and shaping consistent cake pop sizes. |
With this comprehensive list of ingredients and tools, you’re fully equipped to make delightful Valentine cake pops. Let’s move on to creating these sweet treats!

Step-by-Step Recipe for Valentine Cake Pops
Follow these simple steps to create your very own Valentine cake pops. Whether you’re a baking pro or a beginner, this guide will help you achieve perfect results every time!
Step 1: Bake and Crumble the Cake
- Start by baking your cake according to the recipe or package instructions. Popular flavors for Valentine’s Day include red velvet, chocolate, or vanilla.
- Allow the cake to cool completely.
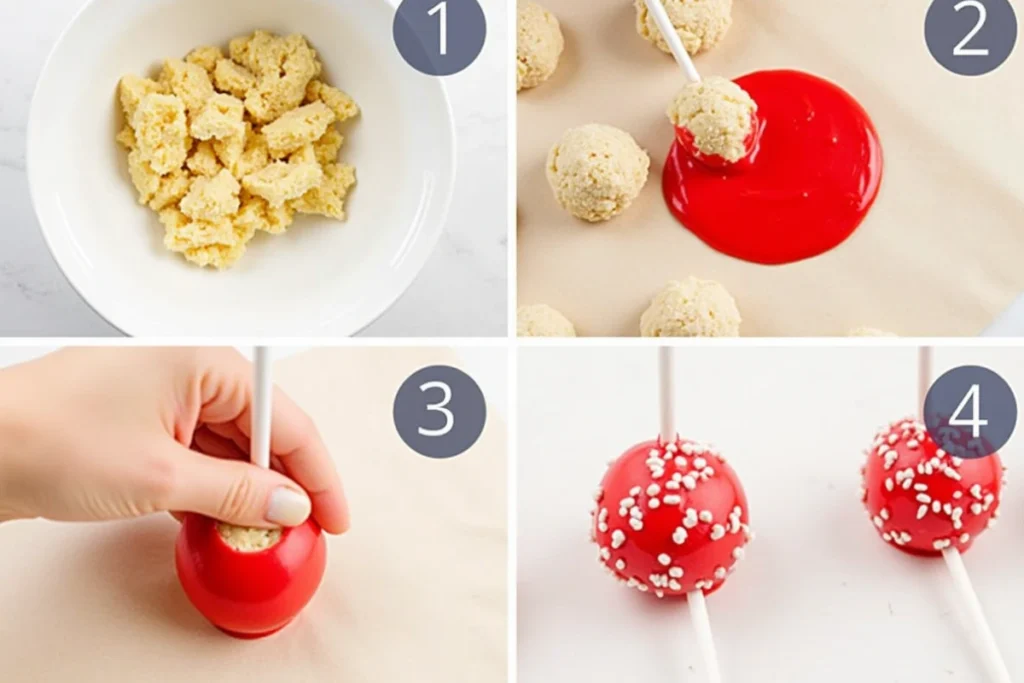
- When the cake has cooled, use your hands or a food processor to break it into fine crumbs. Ensure there are no large chunks left.
Step 2: Mix with Frosting
- In a mixing bowl, add a few spoonfuls of frosting to the cake crumbs.
- Combine them thoroughly until the mixture holds together when pressed. Start with a small amount of frosting and add more as needed.
- Be careful not to add too much frosting, as this can make the mixture too sticky and hard to shape.
Step 3: Shape and Chill
- Grab small amounts of the mixture and shape them into balls approximately 1 inch in diameter.
- For a Valentine twist, shape some into hearts using a mold or your hands.
- Place the shaped cake balls onto a parchment-lined baking sheet.
- Insert a cake pop stick into each ball, dipping the tip of the stick into melted candy melts beforehand to help it stick.
- Chill the cake pops in the refrigerator for at least 1-2 hours, or until firm.
Step 4: Dip and Decorate
- Melt candy melts in a microwave-safe bowl according to the package instructions. Stir until smooth.
- Dip each chilled cake pop into the melted candy, ensuring it’s fully coated. Gently tap off any excess coating.
- Before the coating hardens, decorate with sprinkles, edible glitter, or other decorations. Be creative with red, pink, and white themes!
- Place the coated cake pops upright in a Styrofoam block to dry completely.
Once your Valentine cake pops are decorated and set, they’re ready to be served or packaged as gifts. Enjoy sharing these sweet treats with your loved ones!

Creative Decoration Ideas for Valentine Cake Pops
Decorating your Valentine cake pops is where the fun begins! Get creative with colors, designs, and special touches that will make these treats as beautiful as they are delicious. Here are some ideas to inspire you:
Heart Shapes and Swirls
- Heart-Shaped Cake Pops: Use a heart-shaped mold to create perfectly themed pops, or shape them freehand to add a personal touch.
- Swirls and Patterns: After dipping the cake pops in candy melts, swirl two contrasting colors together for a unique design. You can even use a toothpick to create fun marbled effects.
Romantic Color Themes
- Red, Pink, and White: Stick to a classic Valentine’s color palette with rich reds, soft pinks, and creamy whites for a romantic vibe.
- Metallic Accents: Add a little sparkle with gold or silver accents—sprinkle edible glitter or drizzle metallic-colored candy melts for a luxe finish.
- Ombré Effect: Create a beautiful ombré effect by dipping the cake pops into multiple colors of candy melts, blending them as they dry for a stunning fade.
Personalized Touches
- Initials or Names: Use icing or edible markers to write initials, names, or short messages on the cake pops. This adds a personal and thoughtful touch.
- Edible Glitter: Sprinkle edible glitter on top for a magical, sparkly finish that makes each pop look like it came from a Valentine’s wonderland.
- Love Notes: Attach tiny edible love notes or sugar paper with custom messages—perfect for gifting!
Packaging Tips
- Cellophane Bags: Once your cake pops are fully decorated and dried, place them in clear cellophane bags. Tie them with colorful ribbons for a polished look.
- Gift Boxes: For a more elegant presentation, place your cake pops in small gift boxes lined with tissue paper or crinkle paper.
- Valentine’s Day Tags: Add a custom gift tag or a cute Valentine’s message to each package to complete the presentation.
With these creative decoration ideas, your Valentine cake pops will look just as sweet as they taste. Whether you’re giving them as gifts or enjoying them yourself, these decorating tips will take your cake pops to the next level.

Tips for Making Perfect Valentine Cake Pops Every Time
Achieving flawless Valentine cake pops requires a few key tips and tricks. Whether you’re a beginner or experienced baker, these simple guidelines will help you create smooth, beautiful, and delicious cake pops every time.
Avoid Cracks and Falls: Chill the Cake Balls Adequately Before Dipping
To prevent cracks and ensure that your cake pops stay intact, it’s crucial to chill the cake balls thoroughly before dipping them in candy melts. Place the shaped cake balls in the refrigerator for at least 1-2 hours. This step helps the cake pops firm up, preventing them from falling off the sticks during the dipping process.
Achieving Smooth Coating: Use Candy Melts Properly and Avoid Overheating
For a flawless, smooth finish, melt your candy melts according to the package instructions. Overheating the candy melts can cause them to seize up, resulting in a lumpy coating. To get the perfect consistency, melt the candy in short intervals and stir well between each. If the candy is too thick, you can thin it out by adding a small amount of vegetable oil or shortening.
Storing and Serving: Best Ways to Keep Cake Pops Fresh and When to Serve Them
Cake pops can be made ahead of time and stored to maintain their freshness:
- Storage: Once decorated and dried, place cake pops in an airtight container and refrigerate them. They can stay fresh in the refrigerator for up to a week.
- Serving: Serve your cake pops at room temperature for the best flavor and texture. If serving at a party or gifting them, allow them to rest outside the fridge for 15-20 minutes before serving.
Common Mistakes to Avoid: Highlight Issues Like Overmixing Frosting or Using Wet Decorations
To ensure perfect results, avoid these common mistakes:
- Overmixing the Frosting: Mixing the frosting too much can make it too thin or greasy. Use just enough to bind the cake crumbs together, but don’t overdo it.
- Using Wet Decorations: Avoid decorating your cake pops with wet or sticky items (like fresh fruit) that could cause the candy coating to slide off or become soggy. Stick to dry sprinkles, edible glitter, or dried flowers for the best results.
By following these tips, you’ll be able to create Valentine cake pops that are not only delicious but also perfectly presented. Keep these tricks in mind to avoid common pitfalls and ensure your cake pops are a hit at any celebration!

Conclusion
Valentine cake pops are the perfect sweet treat to celebrate love, bringing together flavor, creativity, and a personal touch. Whether you’re gifting them to someone special or making them for a fun family activity, these bite-sized delights are sure to impress. Their versatility in design, easy-to-follow recipe, and delicious taste make them a must-try for this Valentine’s Day.
We’d love to see your beautiful cake pops! Share your creations with us, or try the recipe to surprise your loved ones with a homemade treat that shows how much you care.
For more fun and festive recipes, be sure to explore our blog for more ideas that will make every occasion sweeter. Don’t forget to follow us on social media for the latest updates, tips, and creative inspiration. Let’s keep baking love into every bite! 💕
FAQs About Valentine Cake Pops
How much does it cost to make one cake pop?
The cost of a single cake pop depends on the ingredients and decorations you use. On average, homemade cake pops cost less than $1 each, making them an affordable yet delightful treat for any occasion.
What are some fun ideas to write on a Valentine’s cake pop?
You can add short, sweet messages like “Be Mine,” “Love You,” or “XOXO” using edible markers or piped icing. Personalized initials or hearts are also a great way to make your Valentine cake pops extra special!
What’s the secret to perfect cake pops?
The key to flawless cake pops is achieving the right consistency when mixing cake crumbs and frosting—just enough to bind without becoming too sticky. Chilling the cake balls before dipping and using properly melted candy coating also ensure smooth and sturdy pops.
Are cake pops cheaper than cupcakes?
Yes, cake pops are often more cost-effective than cupcakes because they use smaller portions of ingredients. They’re also less wasteful, as their bite-sized nature makes them perfect for portion control.

